Exploring an Alternative to Jupyter Notebooks for Python Development
Posted by Chris Moffitt in articles
Introduction
Jupyter notebooks are an amazing tool for evaluating and exploring data. I have been using them as an integral part of my day to day analysis for several years and reach for them almost any time I need to do data analysis or exploration. Despite how much I like using python in Jupyter notebooks, I do wish for the editor capabilities you can find in VS Code. I also would like my files to work better when versioning them with git.
Recently, I have started using a solution that supports the interactivity of the Jupyter notebook and the developer friendliness of plain .py text files. Visual Studio Code enables this approach through Jupyter code cells and the Python Interactive Window. Using this combination, you can visualize and explore your data in real time with a plain python file that includes some lightweight markup. The resulting file works seamlessly with all VS Code editing features and supports clean git check ins.
The rest of this article will discuss how to use this python development workflow within VS Code and some of the primary reasons why you may or may not want to do so.
What is the problem?
Jupyter notebooks are an extremely powerful and effective tool for analyzing data. When I approach a new problem, I will typically create a Jupyter notebook and start investigating the data and developing reports or visualizations to answer my business questions.
As much as I like this workflow, I sometimes struggle with being as efficient as I would be when working with plain python text files.
My biggest concerns are:
- Lack of easy version controlling in github due to all the additional information stored in the .ipynb files.
- Wanting to use a more powerful code editor that would support refactoring and managing larger python scripts more efficiently.
- Giving up a lot of vertical screen real estate for debugging and visualizing the data. I find myself spending a lot of time scrolling through my notebooks to look at prior visualizations or analysis. It can be easy to get lost in a large notebook.
I am certainly not the first to wrestle with notebooks and these issues. This recent series of articles by Lj Miranda is a really solid overview of notebooks, their limitations and best practices for using in production. The second in the series speaks to some of the specific challenges with version control. The final article has some thoughts about his future wishlist.
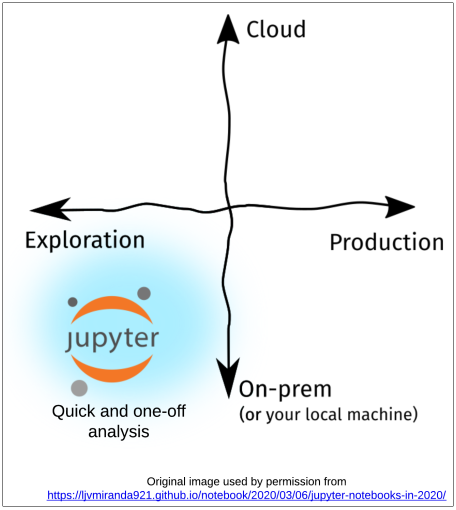
Using the framework that Lj Miranda created, I’m focusing primarily on the lower left quadrant where the analysis is on my local machine and primarily for my consumption. Think of this as a replacement for a one-off Excel spreadsheet analysis.
I would be remiss if I did not discuss the most famous take down of Jupyter notebooks - Joel Grus’ JupyterCon 2018 presentation. He covers some of my points as well as many other concerns. I do not know if this solution will be Joel approved but I think there are some benefits that are pretty compelling.
To be clear, there are still many good reasons to use Jupyter notebooks and I will still use them. However, for much of the analysis I do, this workflow seems a little more powerful and efficient for me. I’m certainly curious to hear what others think.
Notebook Alternative
With that wind up, what is the solution? We can preserve the high degree of interactivity of the Jupyter notebook environment with the simpler file format of a lightweight markup of a plain python text file. VS Code manages this with a combination of code cells and the Python Interactive Window.
As of early 2020, VS Code included support for running Jupyter notebooks natively in VS Code. The entire process is very similar to running the notebook in your browser. If you are not familiar, here is a screenshot of a demo notebook in VS Code.
This approach is great and works well. However, you are still using the native .ipynb notebook file which includes json meta-data as well as the python code and its output. Version controlling is not very user friendly. I mention this because the notebook capability in VS Code provides some of the framework for aa alternative approach.
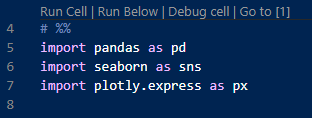
To enable this, you can create a cell block in your normal python text file that operates
like the cell in a Jupyter notebook. This is called a Jupyter code cell or (simply code cell)
which you create in your python script using
# %%
When VS Code sees this code cell markup in a python file, it shows a screen with a CodeLens that looks very similar to the Jupyter notebook control:
This code cell is not terribly useful by itself. The true benefit is that VS Code understands what this markup means and spins up a Jupyter notebook kernel and uses that to run the code content and display the results. Here is a screenshot of the Python Interactive window that VS Code opens when you run a code cell:
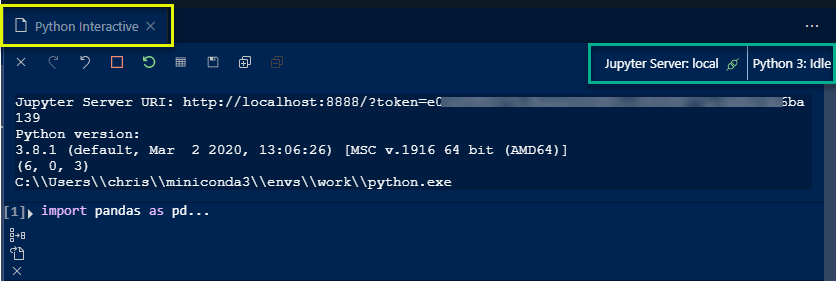
Behind the scenes VS Code has started a Jupyter Server and connected to it. Then it runs the cell and displays the output in a different window. In essence, the code and the output are separated into two columns but still uses the Jupyter server to run the code - like a standard notebook environment.
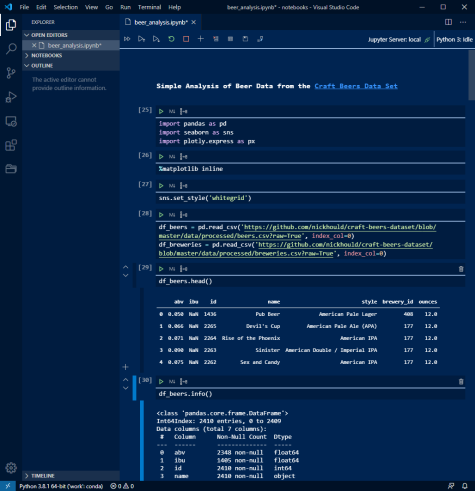
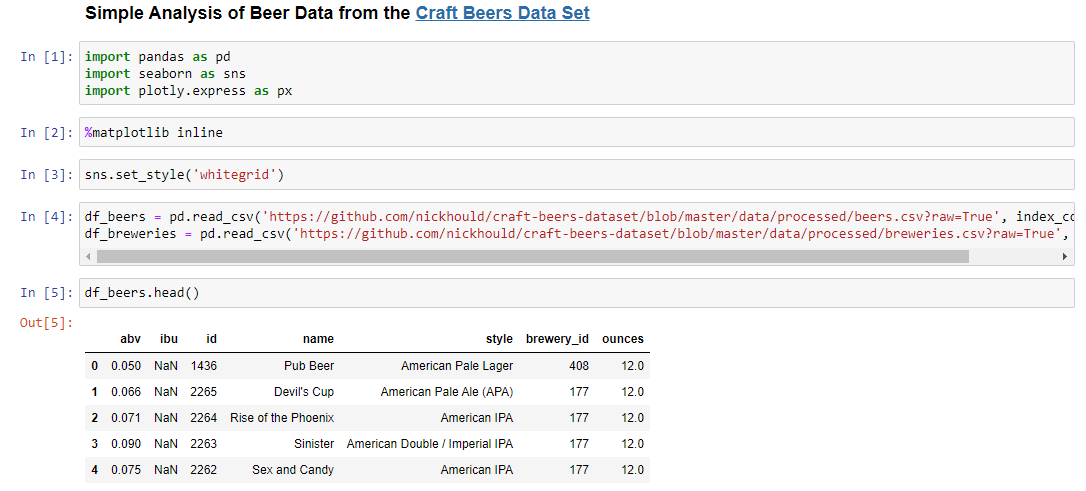
Here is the simple data load and
head
in a Jupyter notebook:
Here is a similar view in VS Code:
This is a more complex view so I definitely recommend that a user be comfortable with working in notebooks first. Then, as they gain experience, they can move to this approach. To a brand new user this may be a bit too much to take in all at once!
Going forward, you can create as many cells as you want by putting the
# %%
in your
python file. Then when you execute the code cell (using CTRL+Enter or clicking Run Cell),
you can see the output in the Python Interactive Window.
This method keeps the code stored in a standard .py file with the only
extra markup
## %
where cells would be delineated. The output is not stored in any
permanent location by default.
Take a look at the
beer_analysis.py
file in github for a concrete example.
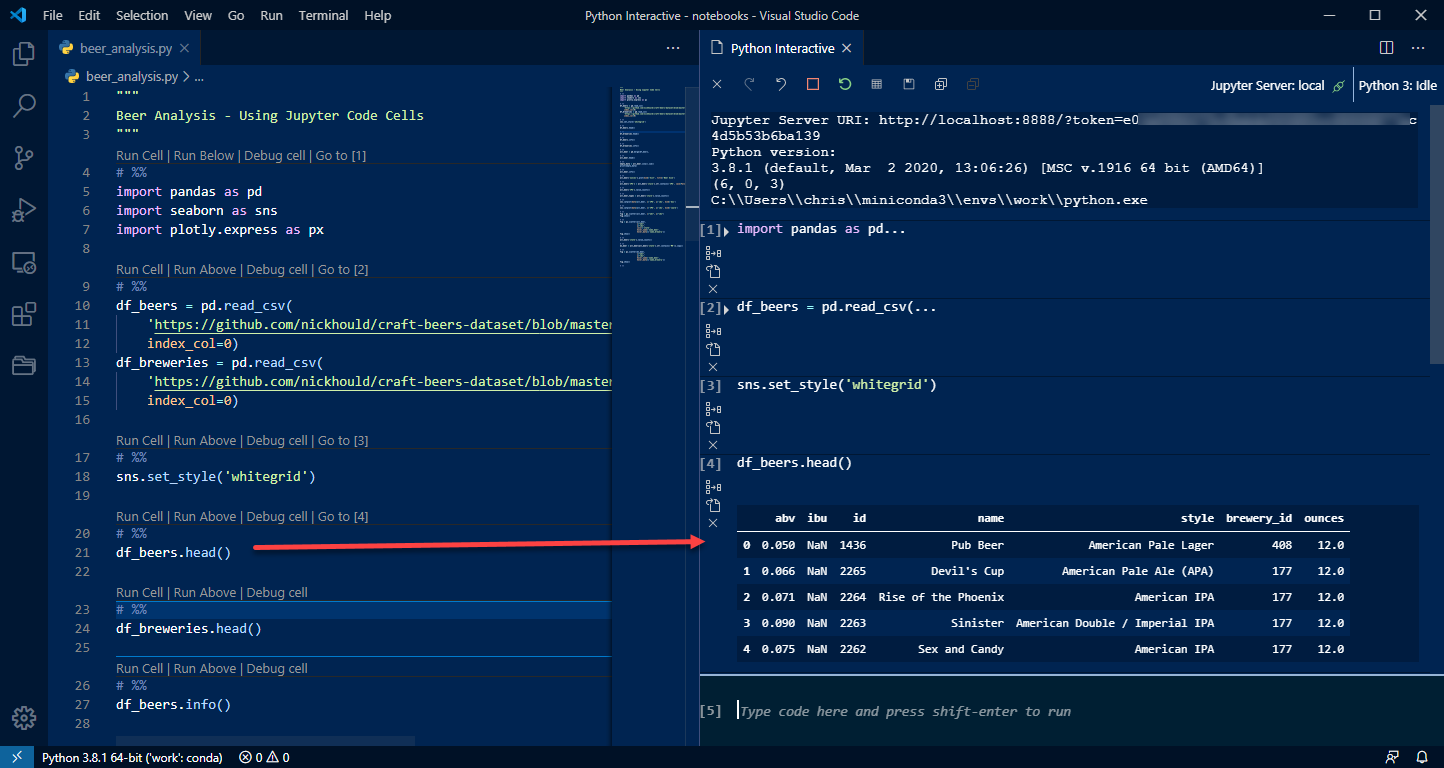
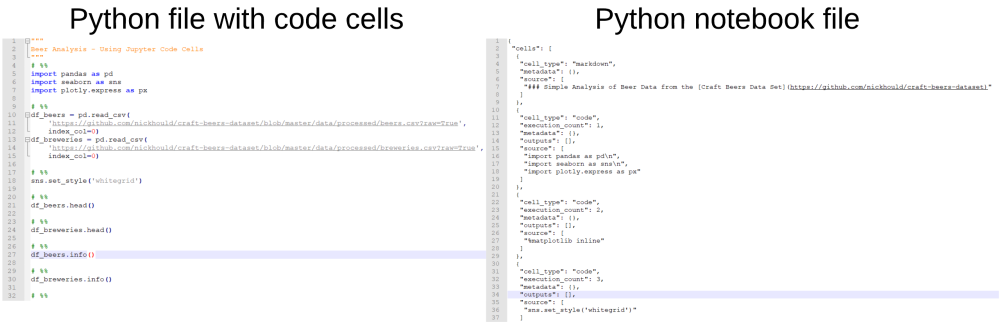
Here is a side by side comparison of the raw data in the two files:
The implications are pretty interesting:
- Using git for the file works as expected. You do not have to sort through the output or other changes that don’t meaningfully change the code.
- You can use all the VS Code extensions and capabilities to edit the whole file.
- You can use the variable explorer and other code navigation to manage the project in a more robust environment.
- When you are done with your analysis, you can easily convert it to a standard notebook for sharing.
- The final results are just a python script. You can type
python beer_analysis.pyto run a file and see the output.
The main downside to this approach is that you lose the rich markdown support available in notebooks. You will need to use an alternative approach to share results.
If you are already using methods such as Email, PowerPoint, Excel or PDFs to share insights, then this approach will provide a nice separation and not a lot of downside.
If you are using a Jupyter Notebook file to share information including markup, code and visualization then this approach may not be best. However, you can always start with code cells to explore and build up the solution on your machine. Then, convert to the notebook format using the Export as Jupyter notebook option when the final product is ready.
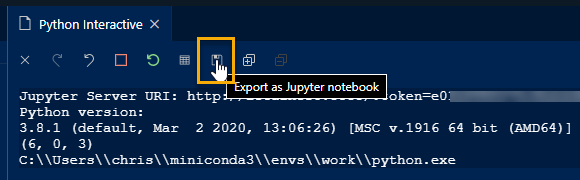
This export feature will save a standard notebook with the output embedded in the file.
For further reference, the approach I mention is very similar to the process presented in an article by Marc Wouts that describes his workflow using PyCharm and some notes about VS Code. He also introduces using jupytext which can help synchronize your Jupyter Notebooks and plain text python files. The jupytext project is really a great idea so it is worth investigating as well.
I also want to highlight that the code cell approach is supported by other editors including Spyder and PyCharm. I have not specifically worked with them but the basic concepts should be the same from a workflow perspective. The actual editor differences are likely more of a personal preference.
Quick Tour
Because the working file is a standard python text file, VS Code provides all the normal editing you would expect. In addition there are a couple of useful extras. To illustrate these concepts, I’m using a sample dataset on American beers from Jean Nicholas-Hould. My example file is available here so feel free to follow along.
The first benefit is the variable explorer shown below:
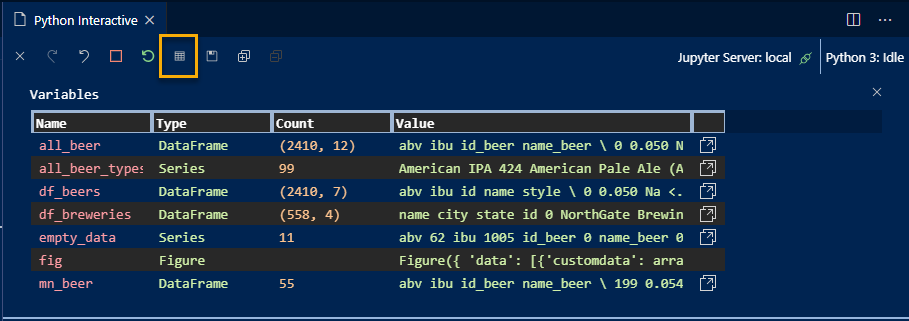
This feature is really nice for pandas DataFrames. You can view the contents of a DataFrame and even filter the rows based on various criteria. It’s like a lightweight Excel autofilter.

I find the data viewer really handy when exploring data. If I forget the exact column names or size of the DataFrame, I can just check the data viewer instead of adding one more line in my notebook to double check.
VS Code also supports data visualization. For example, here is the output of the IBU distribution across different beers:
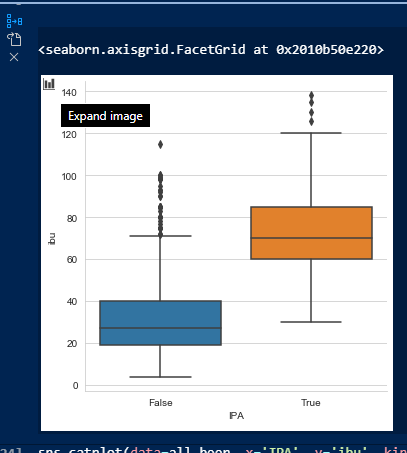
In addition to viewing the plots in the Python Interactive window, there is an option to expand images:
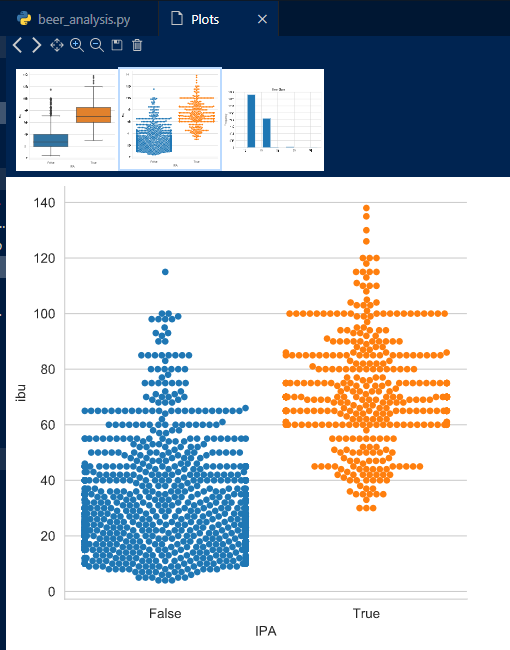
These examples show matplotlib based examples but visualization works as expected for plotly as well:
The one downside of plotly (and likely other javascript plotting libraries) is that they do not show up in the Plots tab. Still, it is useable as is.
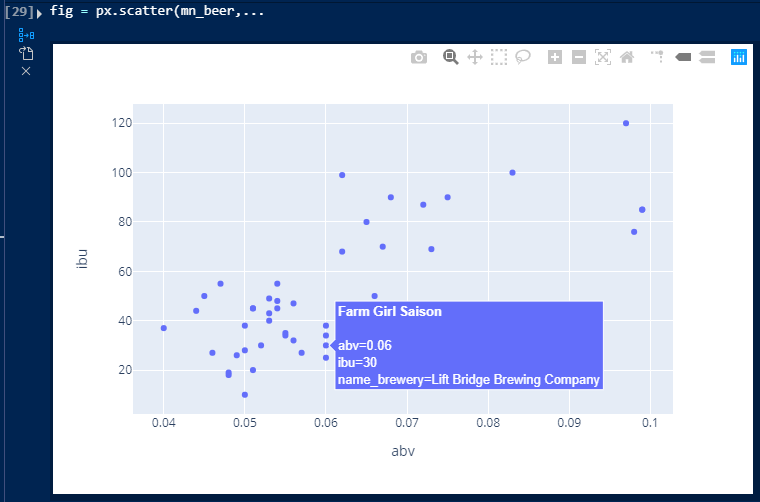
One of the other handy features I use is ALT+F12 to peek at code definitions.
For example, with some visualization code like this:
fig = px.scatter(mn_beer,
                x="abv",
                y="ibu",
                hover_name='name_beer',
                hover_data=['name_brewery'])
fig.show()
I might forget how I defined
mn_beer
, I can press ALT+F12 to code peek and see
how I filtered the data to only include beers from Minnesota:
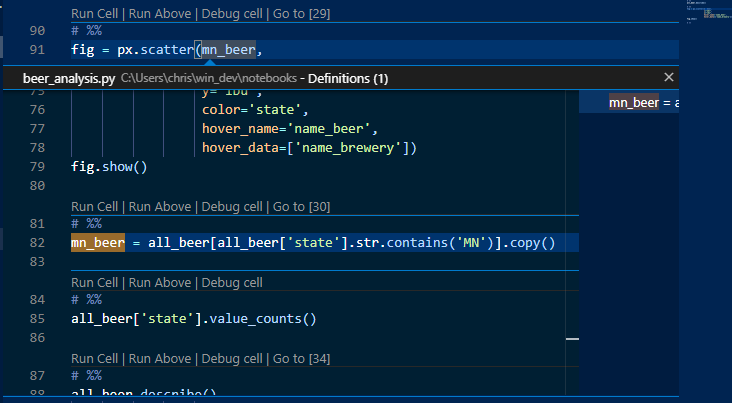
In a Jupyter notebook, I do lots of scrolling to answer questions like this. VS Code helps investigate the code more easily than scrolling back and forth.
Here’s a quick highlight of some of the additional functions I like in VS Code that make working with python easier than in a notebook editor:
- Reformating using YAPF or Black
- Renaming symbols across the entire file
- Document outline to see all the function names
- Intellisense to see function help
- Better syntax coloring
- Git integration
- Minimap
- Code folding
There are certainly extensions for Jupyter notebooks that support many of these features but they are not quite at the level that VS Code is today.
Finally, if you want, you can take a look at the history of the modifications I have made to the sample file. As you can see, the diffs are standard and there is no record of the final output.
Giving it a Try
If you are interested, the best thing to do is try it out. First, make sure you have VS Code with the Microsoft Python extension installed. If you use Anaconda, you should install the Anaconda Extension pack as well.
Once VS Code is setup and working with your python environment, install pandas, seaborn and plotly express.
As I mentioned, I have placed a simple file on github that will download the sample beer set and perform some basic analysis an introduce the functionality. The simplest option is to copy and paste the file into a new VS Code window and save it as a .py file. If all goes, well you should see the Run Cell images on your code.
Clicking
Run Cell
will start the Python Interactive Window and you are good to go.
One other item I recommend is that you setup a shortcut to run all cells. Here is the
entry in my
keybindings.json
file to set up CTRL+BACKSPACE to run all the cells:
{
    "key": "ctrl+backspace",
    "command": "python.datascience.runallcells"
}
To setup your shortcut, press CTRL+K CTRL+S and search for Run All Cells
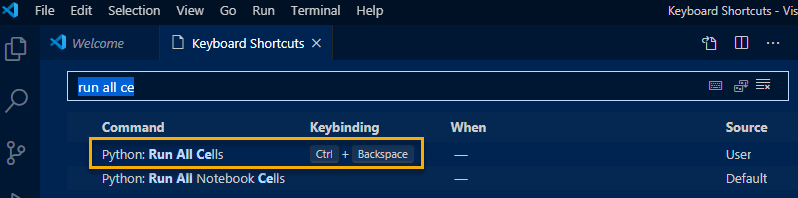
If you don’t have the shortcut, you have to right click to find the Run All Cells option. Feel free to setup the key combo to whatever makes sense to you.
There are also other options you can configure, including whether or not you want to use
# %%
as you Default Cell Marker. I recommend you avoid too much tweaking until
you get some experience with it.
Summary
In the future, I will continue to use Jupyter notebooks - especially as a teaching tool and
when I want to share the full python code and results with others. However, much of my data
analysis is solely for me and the output is presented and discussed in other forms. For
these instances, I will use the
## %
markup to define code cells in my python text
file, edit with VS Code and interact with my data through the Python Interactive window.
In the short time I’ve been doing this, I have found it really beneficial. Surprisingly, I have not found many people online discussing this approach. My hope is that more people learn about this potential solution and incorporate it in their workflow where it makes sense. Leave a note below if you found this helpful or have been doing this on your own.
Finally, I thought about putting together a small video showing it in action but I wasn’t sure if it would be helpful or not. If you would like a YouTube demo, let me know in the comments.
Comments