Populating MS Word Templates with Python
Posted by Chris Moffitt in articles

Introduction
In a previous post, I covered one approach for generating documents using HTML templates to create a PDF. While PDF is great, the world still relies on Microsoft Word for document creation. In reality, it will be much simpler for a business user to create the desired template that supports all the custom formatting they need in Word versus trying to use HTML+CSS. Fortunately, there is a a package that supports doing a MS Word mailmerge purely within python. This approach has the advantage of running on any system - even if Word is not installed. The benefit to using python for the merge (vs. an Excel sheet) is that you are not limited in how you retrieve or process the data. The full flexibility and power of the python ecosystem is at your finger tips. This should be a useful tool to keep in mind any time you need to automate document creation.
Background
The package that makes all of this possible is fittingly called docx-mailmerge. It is a mature package that can parse the MS Word docx file, find the merge fields and populate them with whatever values you need. The package also support some helper functions for populating tables and generating single files with multiple page breaks.
The one comment I have about this package is that using the term “mailmerge” evokes a very simple use case - populating multiple documents with mailing addresses. I know that the standard Word approach is to call this process a mailmerge but this “mailmerge” can be a useful templating system that can be used for a lot more sophisticated solution than just populating names and addresses in a document.
Installation
The package requires lxml which has platform specific binary installs. I recommend using conda to install lxml and the dependencies then using pip for the mailmerge package itself. I tested this on linux and Windows and seems to work fine on both platforms.
conda install lxml
pip install docx-mailmerge
That’s it. Before we show how to populate the Word fields, let’s walk through creating the Word document.
Word Merge Fields
In order for docx-mailmerge to work correctly, you need to create a standard Word document and define the appropriate merge fields. The examples below are for Word 2010. Other versions of Word should be similar. It actually took me a while to figure out this process but once you do it a couple of times, it is pretty simple.
Start Word and create the basic document structure. Then place the cursor in the location where the merged data should be inserted and choose Insert -> Quick Parts -> Field..:

From the Field dialog box, select the “MergeField” option from the Field Names list. In the Field Name, enter the name you want for the field. In this case, we are using Business Name.
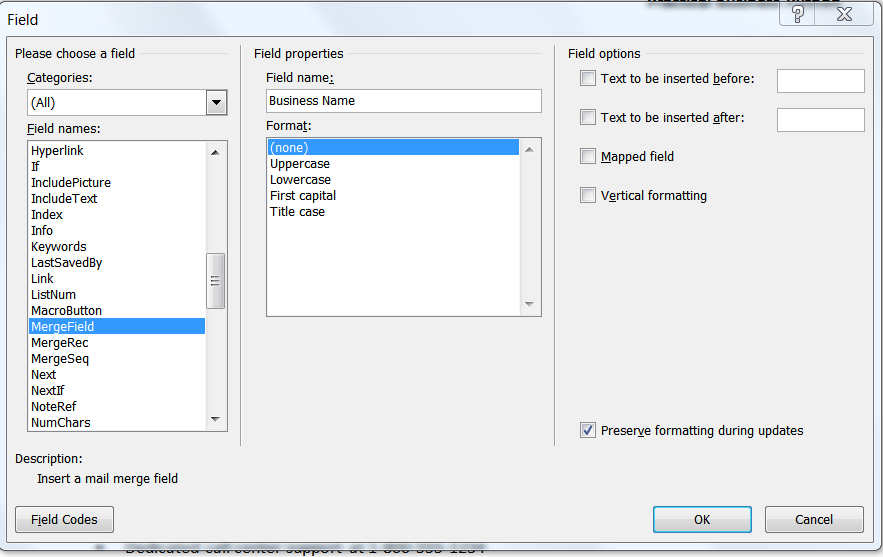
Once you click ok, you should see something like this: <<Business Name>> in the Word document. You can go ahead and create the document with all the needed fields.
Simple Merge
Once you have the Word document created, merging the values is a simple operation. The code below contains the standard imports and defines the name of the Word file. In most cases, you will need to include the full path to the template but for simplicity, I am assuming it is in the same directory as your python scripts:
from __future__ import print_function
from mailmerge import MailMerge
from datetime import date

template = "Practical-Business-Python.docx"
To create a mailmerge document and look at all of the fields:
document = MailMerge(template)
print(document.get_merge_fields())
{'purchases', 'Business', 'address', 'discount', 'recipient', 'date', 'zip', 'status', 'phone_number', 'city', 'shipping_limit', 'state'}
To merge in the values and save the results, use
document.merge
with all of
the variables assigned a value and
document.write
to save the output:
document.merge(
    status='Gold',
    city='Springfield',
    phone_number='800-555-5555',
    Business='Cool Shoes',
    zip='55555',
    purchases='$500,000',
    shipping_limit='$500',
    state='MO',
    address='1234 Main Street',
    date='{:%d-%b-%Y}'.format(date.today()),
    discount='5%',
    recipient='Mr. Jones')

document.write('test-output.docx')
Here is a sample of what the final document will look like:

This is a simple document but pretty much anything you can do in Word can be turned into a template and populated in this manner.
Complex Merge
If you would like to replicate the results onto multiple pages, there is a shortcut
called
merge_pages
which will take a list of dictionaries of key,value pairs
and create multiple pages in a single file.
In a real world scenario you would pull the data from your master source (i.e. database, Excel, csv, etc.) and transform the data into the required dictionary format. For the purposes of keeping this simple, here are three customer dictionaries containing our output data:
cust_1 = {
    'status': 'Gold',
    'city': 'Springfield',
    'phone_number': '800-555-5555',
    'Business': 'Cool Shoes',
    'zip': '55555',
    'purchases': '$500,000',
    'shipping_limit': '$500',
    'state': 'MO',
    'address': '1234 Main Street',
    'date': '{:%d-%b-%Y}'.format(date.today()),
    'discount': '5%',
    'recipient': 'Mr. Jones'
}

cust_2 = {
    'status': 'Silver',
    'city': 'Columbus',
    'phone_number': '800-555-5551',
    'Business': 'Fancy Pants',
    'zip': '55551',
    'purchases': '$250,000',
    'shipping_limit': '$2000',
    'state': 'OH',
    'address': '1234 Elm St',
    'date': '{:%d-%b-%Y}'.format(date.today()),
    'discount': '2%',
    'recipient': 'Mrs. Smith'
}

cust_3 = {
    'status': 'Bronze',
    'city': 'Franklin',
    'phone_number': '800-555-5511',
    'Business': 'Tango Tops',
    'zip': '55511',
    'purchases': '$100,000',
    'shipping_limit': '$2500',
    'state': 'KY',
    'address': '1234 Adams St',
    'date': '{:%d-%b-%Y}'.format(date.today()),
    'discount': '2%',
    'recipient': 'Mr. Lincoln'
}
Creating a 3 page document is done by passing a list of dictionaries to the
merge_pages
function:
document.merge_pages([cust_1, cust_2, cust_3])
document.write('test-output-mult-custs.docx')
The output file is formatted and ready for printing or further editing.
Populating Tables
Another frequent need when generating templates is efficiently populating a table
of values. In our example, we could attach an exhibit to the letter that includes
the customer’s purchase history. When completing the template, we do not know how
many rows to include and the challenge of naming each field would get overwhelming
very quickly. Using
merge_rows
makes table population much easier.
To build out the template, create a standard Word table with 1 row and insert the fields in the appropriate columns. There is no special formatting required. It should look something like this:

Next, we need to define a list of dictionaries for each item in the table.
sales_history = [{
    'prod_desc': 'Red Shoes',
    'price': '$10.00',
    'quantity': '2500',
    'total_purchases': '$25,000.00'
}, {
    'prod_desc': 'Green Shirt',
    'price': '$20.00',
    'quantity': '10000',
    'total_purchases': '$200,000.00'
}, {
    'prod_desc': 'Purple belt',
    'price': '$5.00',
    'quantity': '5000',
    'total_purchases': '$25,000.00'
}]
The keys in each dictionary correspond to the merge fields in the document. To build out the rows in the table:
document.merge(**cust_2)
document.merge_rows('prod_desc', sales_history)
document.write('test-output-table.docx')
In this example, we pass a dictionary to
merge
by passing
the two
**
. Python knows how to convert that into the
key=value
format that the function needs. The final step is to call
merge_rows
to
build out the rows of the table.
The final result has each row populated with the values we need and preserves the default table formatting we defined in the template document:

Full Code Example
In case the process was a little confusing, here is a full example showing all of the various approaches presented in this article. In addition, the template files can be downloaded from the github repo.
from __future__ import print_function
from mailmerge import MailMerge
from datetime import date

# Define the templates - assumes they are in the same directory as the code
template_1 = "Practical-Business-Python.docx"
template_2 = "Practical-Business-Python-History.docx"

# Show a simple example
document_1 = MailMerge(template_1)
print("Fields included in {}: {}".format(template_1,
                                         document_1.get_merge_fields()))

# Merge in the values
document_1.merge(
    status='Gold',
    city='Springfield',
    phone_number='800-555-5555',
    Business='Cool Shoes',
    zip='55555',
    purchases='$500,000',
    shipping_limit='$500',
    state='MO',
    address='1234 Main Street',
    date='{:%d-%b-%Y}'.format(date.today()),
    discount='5%',
    recipient='Mr. Jones')

# Save the document as example 1
document_1.write('example1.docx')

# Try example number two where we create multiple pages
# Define a dictionary for 3 customers
cust_1 = {
    'status': 'Gold',
    'city': 'Springfield',
    'phone_number': '800-555-5555',
    'Business': 'Cool Shoes',
    'zip': '55555',
    'purchases': '$500,000',
    'shipping_limit': '$500',
    'state': 'MO',
    'address': '1234 Main Street',
    'date': '{:%d-%b-%Y}'.format(date.today()),
    'discount': '5%',
    'recipient': 'Mr. Jones'
}

cust_2 = {
    'status': 'Silver',
    'city': 'Columbus',
    'phone_number': '800-555-5551',
    'Business': 'Fancy Pants',
    'zip': '55551',
    'purchases': '$250,000',
    'shipping_limit': '$2000',
    'state': 'OH',
    'address': '1234 Elm St',
    'date': '{:%d-%b-%Y}'.format(date.today()),
    'discount': '2%',
    'recipient': 'Mrs. Smith'
}

cust_3 = {
    'status': 'Bronze',
    'city': 'Franklin',
    'phone_number': '800-555-5511',
    'Business': 'Tango Tops',
    'zip': '55511',
    'purchases': '$100,000',
    'shipping_limit': '$2500',
    'state': 'KY',
    'address': '1234 Adams St',
    'date': '{:%d-%b-%Y}'.format(date.today()),
    'discount': '2%',
    'recipient': 'Mr. Lincoln'
}

document_2 = MailMerge(template_1)
document_2.merge_pages([cust_1, cust_2, cust_3])
document_2.write('example2.docx')

# Final Example includes a table with the sales history

sales_history = [{
    'prod_desc': 'Red Shoes',
    'price': '$10.00',
    'quantity': '2500',
    'total_purchases': '$25,000.00'
}, {
    'prod_desc': 'Green Shirt',
    'price': '$20.00',
    'quantity': '10000',
    'total_purchases': '$200,000.00'
}, {
    'prod_desc': 'Purple belt',
    'price': '$5.00',
    'quantity': '5000',
    'total_purchases': '$25,000.00'
}]

document_3 = MailMerge(template_2)
document_3.merge(**cust_2)
document_3.merge_rows('prod_desc', sales_history)
document_3.write('example3.docx')
Conclusion
I am always happy to find python-based solutions that will help me get away from using MS Office automation. I am generally more proficient with python and feel that the solutions are more portable. The docx-mailmerge library is one of those simple but powerful tools that I am sure I will use on many occasions in the future.
Comments